


Namgrass Installation
Installation Step 1 - Calculating Grass required
Before starting work you need to calculate how much artificial grass you will require. Carefully measure the overall length and width of the planned turfed area. Always allow for the widest part of the lawn.
Namgrass artificial grass is supplied from 2 metre or 4 metre wide rolls. For a garden area of 5.2 metre wide and 6 metre long you would need 2 rolls: 4m x 6m and 2m x 6m. You would then cut back from the 4 metre (possibly 2 metre) roll to achieve you 5.2 metre width.
Now for the physical bits, preparing the ground. If you are replacing an old lawn then you will need to remove all the old turf. This can be achieved with a garden, or turf spade in most gardens. For larger turfed areas then you can consider hiring a turf cutter. It will make the job much quicker and easier and it helps take the hassle out of achieving a level surface. Whatever the ground is like it needs to be levelled as much as practical
When the areas to be grassed are ready you can move to the boundary preparation in Step 2
Installation Step 2 – preparing garden boundaries
Step 1 of the installation dealt with the clearing and preparation of the garden. Now the installer needs to prepare the boundaries for the grass installation
You can help to preserve the appearance of the installed Namgrass by putting a neat, durable edge around it. By creating straight edges you can help with the measurement and the cutting of the artificial grass. Your choice of boundary materials includes timber, plastic lumber, bricks, concrete or even metal. When choosing your materials to edge the grassed area you also need to account for the pile height of the Namgrass. Your artificial grass pile height is typically in the range from of 10mm to over 30mm.
You can install a firm boundary to make the grassed area a regular shape. This makes measuring and preparing the artificial grass more accurate. You can use them to subdivide grass areas if the task of joining grass feels “too advanced”. Timber won’t last forever in ground contact so you should treat cut ends with timber end preservative. The boundary will also help when it comes to compressing the hardcore and sand dressing. Installers normally use longer spirit levels wherever possible to ensure the boundaries are as level as practically possible. Spending your time in careful preparation generally yields a better final result.
When the grass boundary edging is put in place then the final preparation can begin. The area to be “grassed” will be covered with a layer of fine aggregate, see Installation Step 3
Installation Step 3
Having cleared and prepared the section of the garden in Step 2, it is now time to look at preparing the boundaries of the installation
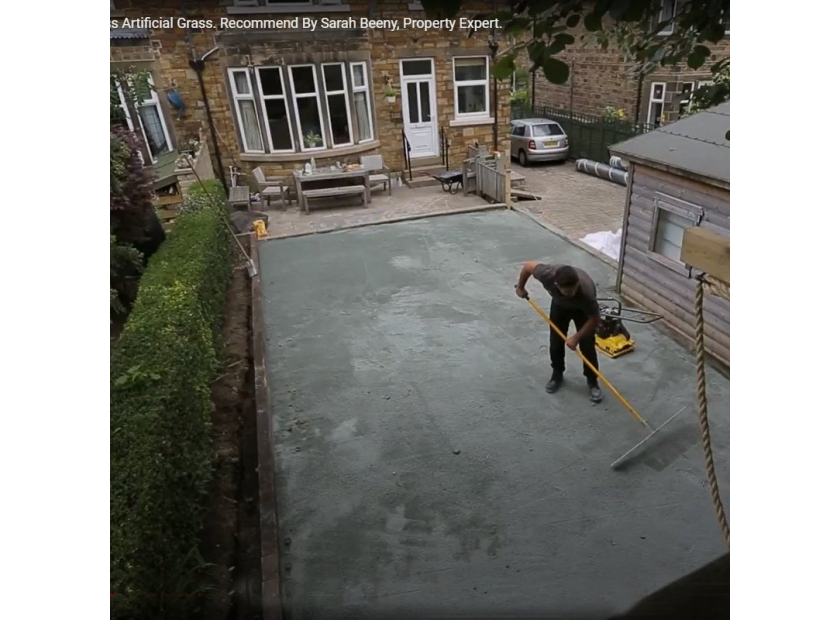
Once the edge is in place, the entire area needs to be covered with a layer of fine aggregate such as ‘Grano dust’, ‘Dust’ or ‘Fine Type 1’. Most local builders merchant will be able to advise and supply. Particles should be no bigger than 5mm. They will need the install measurements, including the depth, so they can calculate the quantity.
Next, compacting of the dust will involve the purchase, or hire, of an earth rammer. If you don’t fancy a full workout then make another trip to the hire shop for a compacter. THIS IS AN IMPORTANT STEP which is needed to compress the material and provide a firm base. Continue to add the fine aggregate and keep compacting until the layer is between 40-60mm deep. You should keep the base layer roughly 20mm below the top of your edging. Remember to form a slight camber so the base slopes towards the edges. This will help you to accommodate any settlement over time.
It’s a good idea for the installer to spray the area with water. This will help to keep the dust down and for the aggregate to bind. Finally you should cover the base layer with a weed membrane. Make sure you secure the weed fabric close up to the boundary edging.
When the sub-layer has been prepared then the time is ready for laying the artificial grass.
Installation of Namgrass Step 4
By the end of Step 3 the weed fabric should be laid and the top layer compacted. This sand or grit layer should be as level as possible using a spirit level and tamper.
Loose lay the Namgrass over the prepared area. Overlap the edges of the Namgrass so there is enough material to trim for a close finish. In some larger installs there may be a need to join two or more pieces together. Roll these pieces out as well, ensuring the pile runs the same way. Leave the Namgrass to settle for a couple of hours. Then carefully cut the overlapping edges so they fit neatly and snugly up to the edging. This task requires a good shape knife
When the edging is in place, the entire area that needs to be “grassed” should be covered with a layer of fine aggregate, see Step 5
Installation Step 5
Having rolled out the grass, you can cut and secured the edges of the grass in Step 4, you can now look at applying the finishing touches of your installation
Adding Kiln Dried Sand
Whilst it’s not essential, you can infill artificial grass products with an even layer of kiln dried sand. Add approximately 5 kg per square metre of artificial grass. This sand will provide additional stability and weight to the grass. Therefore this addition will give you a more stable and professional looking product. After spreading the sand, brush up the grass to lift the pile and settle the sand in. If you are installing grass in a large area you might want to hire equipment. For most installations your normal garden tools will be sufficient
When your area is grassed and sand added it is time for the final step – put your feet up!
https://www.youtube.com/watch?v=S7UDdEQLMsk
Short Code:
Credit Limit:
Current Balance: